Edition
The main purpose of the application is to be able to create and organise several instances of previously defined concepts. Thus the main focus of the application is the interface to input such information.
The screen is split into three main parts:
-
on the left side the Instances tree where all the instances are present and can be added, moved, removed, …
-
on the top right side the Metadata and dictionary editor where the name and description of the Arch file are presented as well as the associated dictionary.
-
on the bottom right side the Instance editor where the currently selected instance can be edited
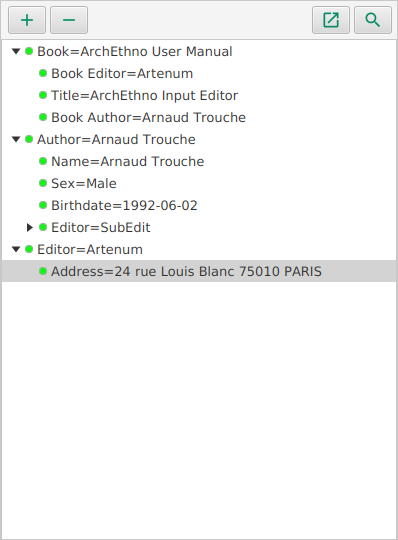
Instances tree
The instances tree is the main entry point of the application where the instances can be created, moved, deleted and selected for further modifications.
Let’s first focus on the buttons on the top of the tree that enable most of the functions of the application.
| Button | Action | Available |
|---|---|---|
|
Opens a dialog box to add a new instance to the tree. |
Always |
|
Deletes the instance currently selected in the tree and all its children. |
When an instance is selected |
|
Open in a new window a read-only view of the data. |
Always |
|
Opens the search panel. |
Always |


Below the button bar, the tree displays all the instances already present in the Arch file.
By performing a right-click on the tree, a context menu is available. The table below shows the available actions:
| Text | Action | Available |
|---|---|---|
Add new instance |
Opens a dialog box to add a new instance. |
Always |
Remove selected instance |
Deletes the instance currently selected in the tree and all its children. |
When an instance is selected |
Collapse all |
Close all parent instances to only show instances with no parent. |
Always |
Clear selection |
Un-select the instance to be able to add a root instance (see add new instance). |
When an instance is selected |
Hierarchy
The tree represents the hierarchy between parent and children elements.An arrow in front of an instance indicates that this instance has children.By clicking on it, it is possible to display its direct children.If there is no arrow, the instance has no children.
For elements of the same level in the hierarchy ("siblings"), the instances are sorted by their concept’s sort order value. For two instances of the same concept, the sorting is performed by comparing the values of the instances (alphabetical order for text, numerical order for numbers, chronology for dates, … ).
Privacy level
In the tree, a coloured sticker in front of the instance indicates its privacy level.The greener the value, the less private the instance is and in contrary the redder the more confidential.In classic ethnographic studies, there are three predefined levels of confidentiality:
- green
-
public data that can be shared on the internet
- yellow
-
restricted data for selected people (i.e. thesis jury, article reviewers, …)
- red
-
confidential data that only the author can view
Add new instance
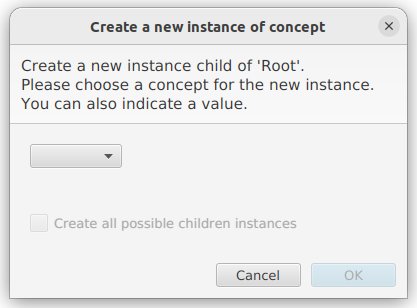
When clicking on add new instance button or via the context menu, the dialog presented above appears.It enables to create an instance at the current location in the hierarchy.There are two main cases to determine which parent the new instance will have:
- No instance selected in the tree
-
The new instance will be created as a "top instance", meaning it will not have any parent. This is the case in the screenshot above where the new instance will be created as child of 'Root'.
- An instance is selected in the tree
-
The new created instance will have as parent the currently selected instance in the tree.
There are several steps to create a new instance, as shown on the screenshot below.
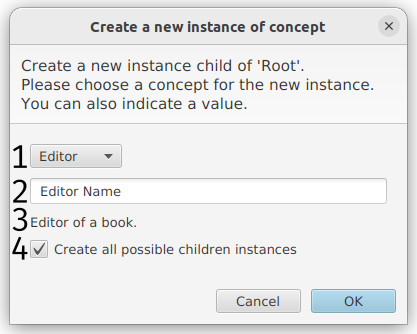
- 1 Select the concept
-
The available list of concept depends on the selected location inside the hierarchy: for new top instances, the available concepts are the "top concepts" and for other instances, the available concepts are children concepts of the concept associated to the parent instance.
- 2 Provide a value (optional)
-
The editor for the type of value of the selected concept appears once the concept is selected. It is not mandatory to provide a value at creation time.
- 3 Description of the selected concept
-
Once the concept is selected this area will display the description of the concept. It can help to provide a value that is consistent with the concept definition.
- 4 Hierarchy creation
-
If this option is selected, one instance for each children concept of the selected concept will be created when the new instance is created.
Then the instance can be created by clicking on OK.
Search function

When clicking on the search button, the simple search panel appears, as shown on the screenshot above .
To perform a simple search, just type a query in the field and click on Search.This simple search will look for the given query text inside the value of the instances in the tree. The search is case insensitive.
When clicking on Search, a notification appears above the search area indicating how many instances satisfying the query have been found. Moreover, in the tree, all matching instances are highlighted in green. Instances that have not been matched are hidden from view, except the parent of matched instances.
To cancel the search and show again all elements, just click again on the
 button.
| If you select an instance in the search filtered tree, after clearing the search as described above, this selected instance will be selected again. |
Filter by concept type
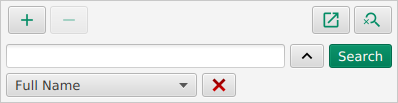
It is possible to perform a search looking for specific concept.
To do so, click on the  button to display the concept filter panel as shown on the screenshot above.
To filter on a concept, simply select in the list the wanted concept to filter search results. Then, like normal search, click on Search to launch the search.
To cancel the search, as for value search, just click again on the
button.
If you want to just remove the concept filter to be able to perform a value only search, click on the red cross to empty the concept filter.
| It is possible to perform a search only using concept type or a search combining the concept type filter and the value query detailed in previous paragraph just by entering a query value and selecting a concept in the list. |
Metadata and dictionary editor
The metadata and dictionary editor provides informations about the current Arch file being created/edited.

The first line shows the name of the current Arch file as well as the ![]() button to change the informations displayed, see
Edition pop-up.
button to change the informations displayed, see
Edition pop-up.
Below, the line indicates the dictionary currently associated with the Arch file. The icon next to the name is here to provide Dictionary status feedback.
|
A detailed explanation of the dictionary status is displayed when hovering on the dictionary name and status icon. |
On the left of the dictionary line, two buttons enable to access dictionary-related functions:
 button
-
Enable to access to history of saves on the dictionary file associated to the data.
 button
-
Enable to export the dictionary attached to the current input to a an external file to be able to use it for another input.
Last, the description of the Arch file is displayed.
Edition pop-up
When clicking on the Edit ![]() button, a pop-up enables to edit the name and description of the Arch file.
button, a pop-up enables to edit the name and description of the Arch file.
It is also possible to update the dictionary linked to this Arch file, if the new selected dictionary is an evolution of the current dictionary.
As for when creating a new file, feedback is provided depending on the selected dictionary and provided name and description.See welcome screen section for more information.
Dictionary status feedback
The background colour of the editor as well as the icon next to the dictionary provide information on the status of the dictionary and what is best performed with the current dictionary.
| Status | Icon | Colour | Details |
|---|---|---|---|
Draft |
|
|
Draft dictionary that will be heavily modified. Instances should be created only for dictionary testing purpose. |
Work-In-Progress |
|
|
Work-In-Progress dictionary that can still be heavily modified. Created instances will probably need to be updated to new versions of concepts. |
Stable |
|
|
Stable dictionary that will not be modified heavily. Instances can be created without limits. |
Obsolete |
|
|
Obsolete dictionary. No new instances should be created using such dictionary. |


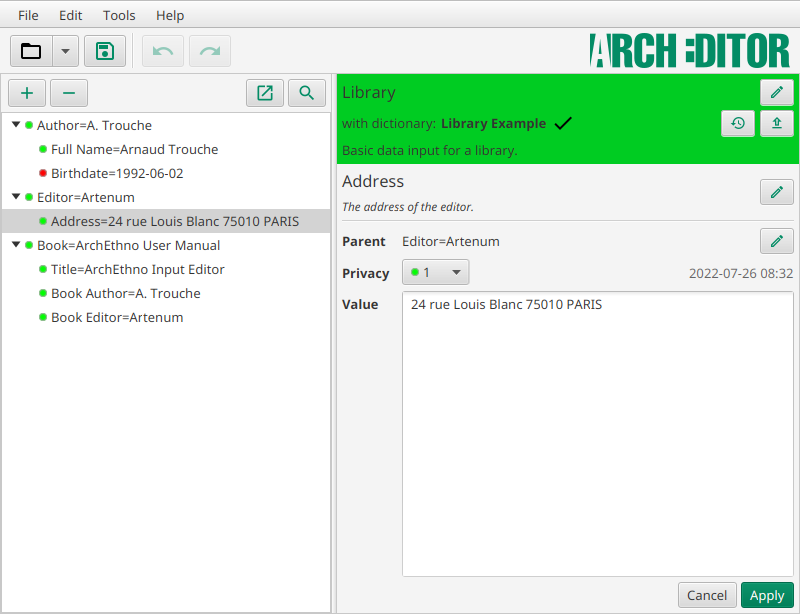
Instance editor
When an instance is selected in the tree, the instance editor on the right of the application is filled with this instance information.
A view of the instance editor is visible below.
The instance editor is separated into two separate parts. First, the concept associated to the instance is shown with its description. Then, below it is possible to edit other instance elements such as its value.
Concept viewer
The first line shows the name of the concept associated to the instance, the following lines presenting the description of this concept.
The Edit  button on the right enables changing the concept associated to the current instance.

When updating the dictionary, a concept may have been modified. In this case, the instance editor will provide informations that the concept can be updated to its latest version as shown below: the concept name is coloured in blue and an additional icon appears.

The Update concept  enables to select a newer version of the concept.
It opens a new window, as shown below, that shows the current value of the concept and the possible new versions of the concept.
enables to select a newer version of the concept.
It opens a new window, as shown below, that shows the current value of the concept and the possible new versions of the concept.
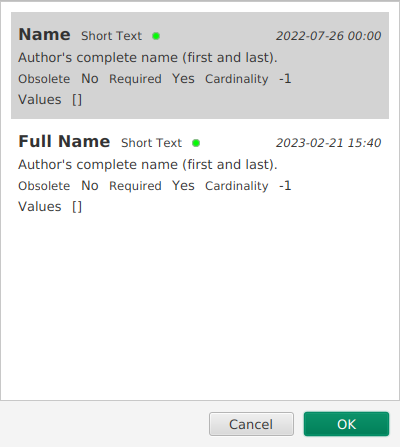
By selecting the newest version of the concept and validating with OK, the instance will be modified to use the latest concept (once the modifications are validated by clicking on Apply).
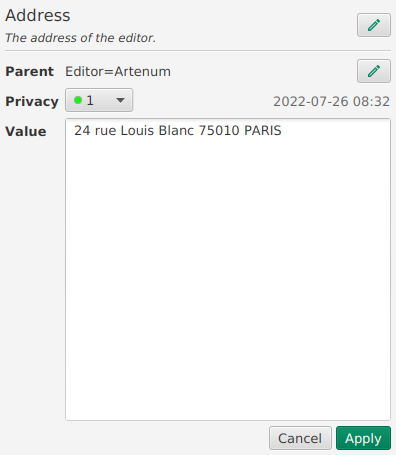
Value and privacy editor
- Parent
-
Indicates the parent of the instance. When the instance is a "top instance", it displays None. When the edition mode is 'Expert', a Edit
button on the right enables to select a new parent for the instance. - Privacy
-
Displays and enables to choose the Privacy level for the instance. On the right, the date-time of creation of the instance is displayed
- Value
-
This editor enables to set/update the value ofthe instance. This particular field evolves depending on the type of data defined in the concept.
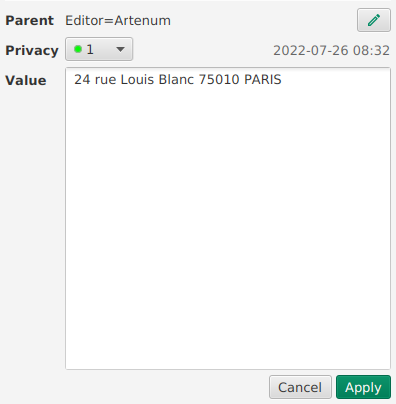
Once the values are filled up / updated, it is necessary to click on Apply to take into account the changes to the instance.